Raspberry Pi is a small microcomputer, with built in graphics processor. The graphics processor and the CPU share 256MB of RAM in its Model A and 512 in its model B version. There are two USB Port, one HDMI / RCA Video connector Ethernet controller ,SD Card(4GB ,Class4 Min) and general-purpose I/O Port. Figure shows a Raspberry Pi model B with an SD card inserted for scale. The Sd card is use to boot the operating system and work as our hardisk in computer system. In this tutorial we will mostly focuses on the basic setup to getting start with raspbery pi and preaparing the SD card with some tools.
Raspberry Pi can be interfaced with a USB keyboard and mouse and an HDMI monitor or RCA Video television port. The Ethernet gives us the power to connect with it internet. The SSH Server enables more options for networking and use the other keyboards to be interfaced. Internet can be connected using usb 3g adapter or wifi adapter.
BASIC REQUIREMENT :
1) Download the wheezy-raspbian OS.
Latest image of wheezy-raspbian image CLICK HERE
Latest torrent file of wheezy-raspbian CLICK HERE TORRENT
Raspberry Pi can be interfaced with a USB keyboard and mouse and an HDMI monitor or RCA Video television port. The Ethernet gives us the power to connect with it internet. The SSH Server enables more options for networking and use the other keyboards to be interfaced. Internet can be connected using usb 3g adapter or wifi adapter.
BASIC REQUIREMENT :
Create the Folder with name Raspberry -pi
Save all these tools in this folder
Latest image of wheezy-raspbian image CLICK HERE
Latest torrent file of wheezy-raspbian CLICK HERE TORRENT
2) Download the SD Formatter CLICK HERE
Click on the I Accept
3) Download the win32diskimager CLICK HERE
Preparing The SD Card STEPS:
- First Extract the the OS(wheezy-raspbian).
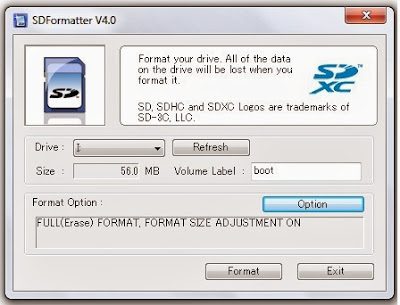
- Now install the SDFormatterv4exe and run the application.
 |
| OPEN SDFormatter |
 |
 |
| Run SDFormatter |
 |
| Finished SDFormatter |
3. Now Run the Disk2imager and put your OS image on it and click on the write.
Run the win32diskimager ...
Browse your image of the OS(Raspbian-wheezy)...
After the browsing the image in win32diskimager and Click on the WRITE ...
Click the yes button it may corrupt the card but don't worry about it...
When your image is successfully written on the SD Card then its all done
Now put your SD Card on the raspberry-pi.
Plug your HDMI cable or else RCA video cable to your monitor/TV.
Put one Mouse and keyboard into USBport.
Plug microUSB cable with a 5v-1amp adapter.
Now power on the raspberry pi.
After powering up the raspberry pi red LED marked PWR will light, and if everything is fine green LED marked OK will blink to show whenever the PI reads from the SD-card.
Once the raspberry-pi finishes loading it will ask for USER_NAME & PASSWORD for wheezy-raspbian
USER_NAME = pi
PASSWORD = raspberry
After entering all these information raspberry pi presented the configuration menu
- expand_rootfs to expad the partition to fill SD card
- next is to configure_keyboard to change layout to US(keyboard style)
- Behaviour change while booting select boot_behaviour to start the desktop at the time of boot.
- Finish the config.
Now once you have done with configuration file then for starting in GUI Mode.
To get onto the GUI System type
startx
********************************************************************************************************
HAVE FUN WITH THE RASPBERRY PI ... FOR ANY QUERY PLEASE COMMENT


nice tutorial..
ReplyDeletehmm thnx
Deletenice one................
ReplyDeletemyTectra Placement Portal is a Web based portal brings Potentials Employers and myTectra Candidates on a common platform for placement assistance
ReplyDeleteThis is great written
ReplyDelete